Virtual box is a free open source to install the secondary operating system on your device and due to this there is no effect for your personal files and folder and there is no issue of failure operating system which you have installed on your device.
The Oracle Virtual Box machine is mainly useful for those who are taking courses like windows server, Linux server, Linux commands etc to practice that any course at their home on their personal computer or Laptop without formatting their current operating system.
So to install windows 7 operating system on a virtual box you must have some pre - requirements on your device because if do not have required pre - requirements your device either is it computer or laptop will slow down. So after seeing that pre - requirements confirm first and then processed to install windows 7 operating system on the virtual box.
So the installation part is so long because of screen shots and for your convenience, to avoid complexity and for easy understand we divided this windows 7 installation process into two parts... So after completion part 1 section please follow the link of ' Part 2 windows 7 installation '.
So here are the steps to install Windows 7 operating system in Virtual box on your device.
Pre Requirements before start.
Part 1: Virtual box setup session
Pre Requirements before start.
➤ Windows 7 Operating system in ISO Format Click here to know how to convert operating system setup files into ISO format.. )
➤ Oracle Virtual Box installed on your device
( If you do not have Oracle Virtual box Click here to know how to install virtual box machine on your device either it is windows XP, Windows 7, Windows 8 / 8.1 and windows 10 operating system )
➤ Free space minimum of 25 - GB on any one of your Hard Disk partition or drive.
➤ RAM Size must be 2 - GB or 4 - GB ( Recommended : 4GB )
➤ Open Virtual Box from desktop shortcut or find it programs and Open it
➤ Now Click on New at Left Side upper
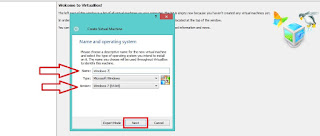
➤ Now Name and Operating system screen appears so in that
➥ Type a Name as per your wish like Ex: Name : Windows 7 and
➥ Select version like either
- Windows 7( 64 bit) if you wish to install windows 7 64 - bit operating system
Or
- Windows 7 (32 bit) if you wish to install windows 7 32- bit operating system
Ex: Version : Windows 7 (64 bit) and click on Next
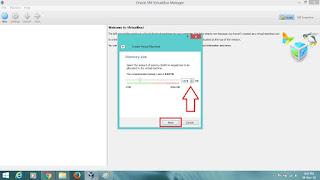
➤ Now Memory Size screen appears in that select RAM - Size minimum of 1GB (Recommended) Or More as per your wish Ex: 1024 MB (1 GB) and Click on Next
➤ In, Hard Disk screen Click on Create
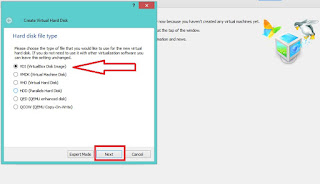
➤ In, Hard disk file type screen Click on Next
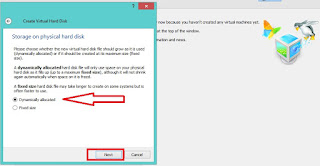
➤ In, Storage on Physical hard disk screen click on Next
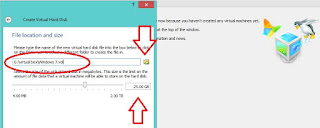
➤ In, File Location and size window select how much size you are going to allocate to Operating systems like 25GB or 30 GB etc (Recommended - 30GB) and click on Create if you have entered free space on C - Drive
Or
➤ If you have Free space on another drive like E-Drive, F-Drive etc other then C - Drive
- Click on Folder icon which is at the end of the name box and select your drive which has enough free space.
- Now make a New Folder in that to give specific location to virtual box machine and click on Save (Ex: E:\Virtualbox\Windows7.vdi ) and then click on Create
➤ After the above screen, the installation windows 7 operating system process ' Half part ' completed and the screen looks like this
➤ So to continue your windows 7 operating system installation process please follow the below link
➤ For Part 2: Windows Installation : Click Here




No comments:
Post a Comment