As the technology increased, the uses of DVDs and Cd's decreased and now all the people are looking for a simplest and short way to install operating system quickly as possible on their device either it is windows 7 or windows 8 or windows 8.1 and windows 10.
So to install operating system quickly on your device one of the most useful and fastest methods is using pen-drive or USB and it is very simple also. So here we are going to learn how to make pen drive bootable to install windows 7, windows 8, windows 8.1 and windows 10 without using any third party software..i.e using the command prompt (cmd)only...
Note: To install " windows XP" using pen drive this process will not support
➽ You must have at least 8GB pen-drive or more also you can..
➽ Please collect windows 7, windows 8/8.1, windows 10 operating system and copy it to your laptop or PC's drive or if you have optical disk's no problem.
➽ Please remember where you copied windows operating system in your PC, i.e is it in E drive, H drive etc or in the DVD drive.
(we recommend you please copy all os files into a folder)
➽ If there any important data in your pen-drive please copy it to any other drives .. because you have to format the pen drive in this process.
Now please follow the steps carefully.. first, insert/stick your pen-drive into USB slots of your laptop or PC and Don't remove your pen-drive while processing.
➽ If you are using windows 7 please find the cmd in the start menu, if you are using windows 8, 8.1, 10 please find cmd in all apps or programs.
➽ After finding cmd right click on it and click Run as Administrator (it will ask you for the password if you set any or if you are not the system administrator) and press Yes.
➽ Now the command prompt(cmd) will appear and in cmd write this commands carefully and please use spaces if any, other wise don't and type as it looks here..!!
➤ First type diskpart and hit Enter (it enters into disk part)
➤ Now type list disk and hit Enter (it will show two drives list so here you can recognize your pen-drive by its size name will not appear .
➤ Now type Select disk 1 (mostly disk 1 is your pen drive if not select that disk with showing number either 1 or 2) and hit Enter.
➤ Now type Clean and hit Enter, (disk will be cleaned by disk part) and then type create partition primary and hit Enter (it will create specified partition) .
➤ Now type select partition 1 and hit Enter (it select your partition) .
➤ Now type active and hit Enter then type format fs=ntfs (this will formats your pen-drive in 15min - 20 min)
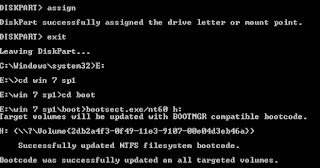
➤ After successfully formatting done now type assign (now you will notice that the drive letter for USB will changes to H: or G: and then type Exit (it will exit the disk part only not cmd).
➤ Now you have to specify the path where you have all files of operating system. i.e if you copied all OS files into E drive you need type E: or if you copied all OS files into another drive F you need to type F:
Note:If your facing to find the correct path and drive letter simply open your drive where you copied your files of operating system and now type that all path seeing in the address bar(red colored line) .
➤ Now type E: and hit Enter and then type cd win 8 and hit Enter and thentype cd boot and hit Enter.
➤ Then type bootsect.exe/nt60 h:(here His your USB drive assigned letter which was shown after assign command) and hit Enter now it will display a message.
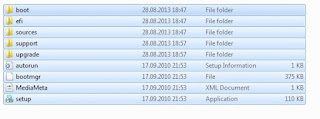
➤ Now finally type Exit and you will exist cmd and then copy all content of
your operating system into your pen drive or USB
That's Completed


No comments:
Post a Comment